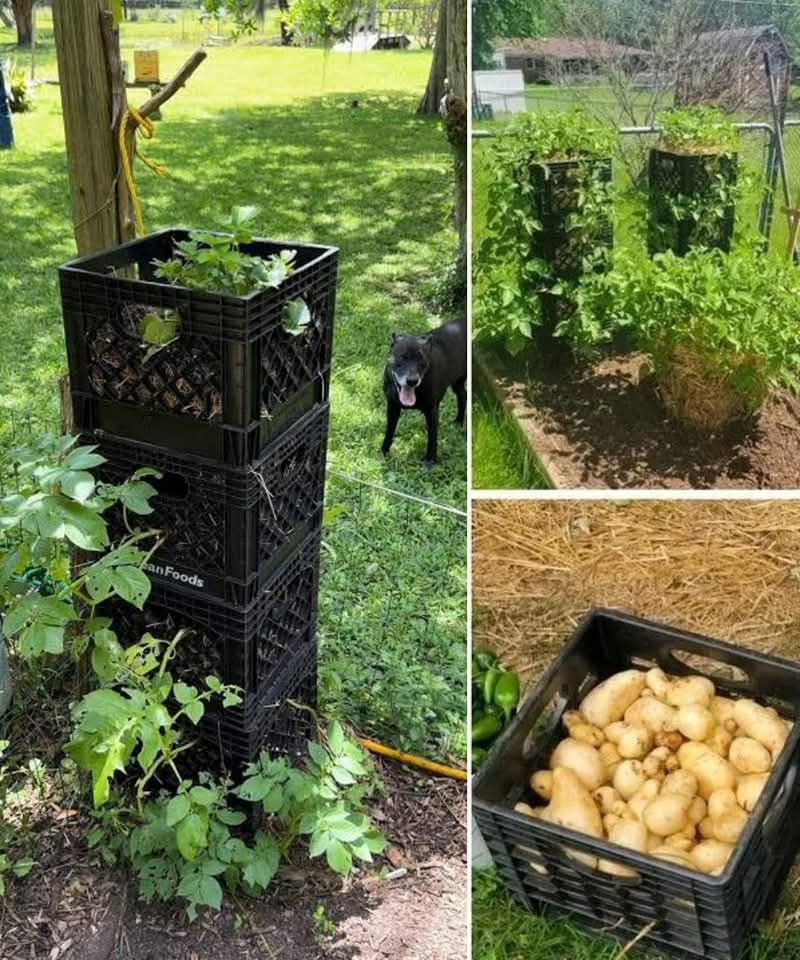
Living in the heart of the urban jungle doesn’t have to mean sacrificing the joys of homegrown produce. With a little ingenuity and even less space, you can cultivate your very own potato patch, right on your balcony or rooftop! This guide will equip you with the knowledge and steps to transform humble milk crates into spudnik farms, turning your urban oasis into a haven for delicious, homegrown potatoes.
Setting the Stage for Spud Success
Choosing the Right Milk Crates:
- Durability is key: Opt for sturdy crates that can withstand the weight of growing potato plants and soil. Plastic crates are readily available and weatherproof, making them a great choice.
- Drainage is essential: Ensure your crates have drainage holes at the bottom to prevent waterlogging, which can damage the roots. If your crates lack drainage, drill holes yourself using a power drill or hammer and nail.
Location, Location, Location:
- Sun seekers: Potatoes crave sunshine, so choose a location that receives at least 6-8 hours of direct sunlight daily. South-facing balconies or rooftops are ideal.
- Shelter from the elements: While sunlight is crucial, protect your potato patch from harsh winds or excessive rain. Consider using a temporary shade cloth during the hottest part of the afternoon in very sunny locations.
Prepping Your Spudnik Farm
Materials:
- Used milk crates (2-3, depending on desired size)
- Staple gun and staples (if using landscape fabric)
- Landscape fabric (optional, for improved drainage and weed control)
- Potting mix: Choose a well-draining potting mix specifically formulated for vegetables or containers.
- Seed potatoes: Opt for certified seed potatoes, available at garden centers or online retailers. Choose varieties suited for container growing, like ‘Yukon Gold,’ ‘Red Pontiac,’ or ‘Fingerling.’
- Fertilizer: A slow-release fertilizer formulated for potatoes will provide sustained nutrients throughout the growing season.
Step-by-Step:
- Lining the crates (optional): If using landscape fabric, cut pieces large enough to line the insides of the crates, leaving enough excess to fold over the top edge. Secure the fabric with staples using the staple gun. This step helps retain moisture and suppress weed growth.
- Filling the crates: Fill the crates with potting mix, leaving about 2-3 inches of space at the top.
- Planting the seed potatoes: Cut your seed potatoes into pieces, each containing at least one “eye” (a small indentation where the sprout will emerge). Lay the potato pieces cut-side up on the potting mix, leaving about 4-6 inches of space between each piece.
- Covering the potatoes: Gently cover the potato pieces with an inch of potting mix.
Nurturing Your Spudnik Farm
Watering: Water your potato plants regularly, keeping the soil consistently moist but not soggy. Aim for deep watering, allowing the water to reach the developing tubers below the surface.
Feeding: Once the plants reach about 6 inches tall, begin applying a slow-release fertilizer according to the manufacturer’s instructions.
Hilling: As the plants grow, gradually add more potting mix around the base, burying the lower portion of the stems. This process, called hilling, encourages the formation of more potatoes and helps support the growing plants. Repeat hilling every few weeks as the plants continue to grow.
Sunlight is key: Ensure your potato plants receive their daily dose of sunshine. Rotate the crates occasionally if necessary to promote even growth on all sides.
Harvesting Your Bounty
Signs of maturity: The potato plants will begin to yellow and die back as the tubers mature. This usually occurs around 60-90 days after planting, depending on the variety.
Time to harvest: Carefully dig into the soil around the base of the plant to locate the potatoes. Be gentle, as they can bruise easily.
Storing your harvest: Allow the potatoes to dry out in a cool, well-ventilated area for a few days before storing them in a cool, dark place. Properly stored potatoes can last for several weeks.
Beyond the Basics: Tips for Spudnik Farm Success
- Companion planting: Consider interplanting your potato patch with herbs like marigolds or nasturtiums, which can deter pests naturally.
- Monitor for pests and diseases: Regularly inspect your plants for signs of pests or diseases and address them promptly using organic methods whenever possible.
- Experiment with different varieties: As you gain experience, try planting different potato varieties to discover your favorites.
- Embrace the learning curve: Don’t be discouraged if your first attempt doesn’t yield a bumper crop. Gardening is a journey of learning and experimentation, and with each season, you’ll gain valuable experience and refine your techniques.