Have you ever dreamt of biting into a juicy, homegrown watermelon, its sweetness a testament to your green thumb? While these summertime staples might conjure images of sprawling fields, you don’t need acres of land to cultivate these refreshing treats. With a little know-how, you can nurture delicious watermelons right on your balcony or patio!
This guide will unveil the secrets to growing watermelons in containers, transforming you from a gardening novice to a watermelon whisperer. We’ll delve into everything you need to know, from selecting the perfect container and nurturing seedlings to harvesting your own crimson bounty.
This post may have affiliate links. This means that sometimes when you click a link on our site and make a purchase on Amazon, we may earn a small commission at no additional cost to you. We only recommend products we truly believe in, and your support helps keep us running!
Choosing Your Watermelon Chariot: Selecting the Right Container
Watermelons are surprisingly adaptable, content to grow in containers as long as their needs are met. The key lies in selecting the right vessel for their journey. Here’s what to consider:
- Size Matters: Think big! Watermelons are vigorous vining plants, and their root systems need ample space to thrive. Opt for a container that holds at least 25 gallons (around 95 liters) of potting mix. Larger containers, like half barrels or raised garden beds, are even better, especially if you plan on growing multiple plants.
- Drainage is King: Stagnant water is the enemy of watermelon roots. Ensure your chosen container has ample drainage holes at the bottom to prevent waterlogging. Consider placing the container on a raised platform to further improve drainage.
- Material Musings: Plastic, wood, and ceramic containers all work well, as long as they meet the size and drainage requirements. Plastic is lightweight and affordable, while wood adds a rustic charm and provides good insulation. Ceramic offers a classic look but can be heavy and prone to cracking.
Crafting the Perfect Watermelon Nursery: Potting Mix and Seed Selection
Now that you have your container chariot, it’s time to create a nurturing haven for your watermelon seeds.
- Building a Balanced Mix: Watermelons require a well-draining, yet moisture-retentive potting mix. Here’s a simple recipe you can follow:
- Combine 2 parts high-quality potting mix with 1 part perlite or coarse sand for drainage.
- Add a handful of organic compost for extra nutrients.
- Check the soil pH level to ensure the mix is between 6.0 and 7.0, which is ideal for watermelon growth.
- Picking the Perfect Seed: Not all watermelons are created equal! When choosing seeds, consider these factors:
- Space Constraints: If balcony space is limited, opt for “bush” or “miniature” watermelon varieties, which take up less space and produce smaller fruits. “Sugar Baby,” “Bush Sugar Baby,” and “Crimson Sweet” are all excellent choices for container gardening.
- Maturity Time: If you live in a region with a shorter growing season, select “early-maturing” varieties that will ripen faster. “Yellow Doll,” “Tendersweet,” and “Mini Love” are good options for these climates.
- Seed Starting: You can either directly sow seeds outdoors in warmer climates or start them indoors in seed trays a few weeks before the last frost for a head start.
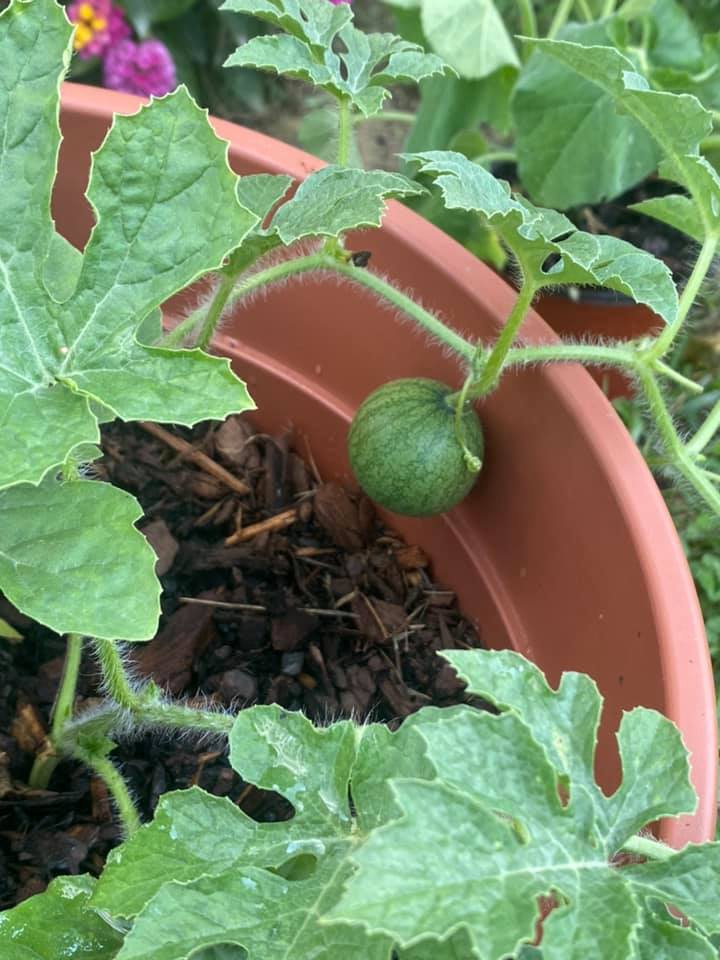
Nurturing Your Seedlings: From Sprout to Vine
With your container prepped and seeds chosen, it’s time to witness the magic of germination!
- Planting Power: Fill your container with the prepared potting mix, leaving about an inch of space at the top. Sow 2-3 seeds per container, planting them about an inch deep. Gently water the soil and place the container in a warm, sunny location (around 70°F or 21°C).
- Sprout Watch: Keep the soil consistently moist, but not soggy. Within a week or two, you should witness the joy of tiny watermelon sprouts emerging. Once the seedlings establish two sets of true leaves, thin them out to the strongest plant per container.
- Sunshine and Support: Watermelon plants are sun worshippers. Provide them with at least 6-8 hours of direct sunlight daily. As the vines begin to grow, offer them support using a trellis, tomato cage, or sturdy stakes. This will prevent the vines from sprawling on the ground and encourage healthy fruit development.
Watering Wisdom: Keeping Your Watermelon Hydrated
Watermelons, as their name suggests, crave consistent moisture. However, overwatering can lead to root rot. Here’s how to strike the perfect watering balance:
- Deep Soaking: Aim to water your watermelon plants deeply, allowing the water to reach the roots. The frequency of watering will depend on factors like climate and pot size. Generally, watering every other day or when the top inch of soil feels dry is a good rule of thumb.
Feeding Frenzy: Nourishing Your Watermelon Plants
Just like us, watermelon plants need a balanced diet to thrive. Here’s how to keep your future melons happy and growing strong:
- Fertilizing for Flavor: Watermelons are heavy feeders, requiring regular fertilization throughout the growing season. A balanced fertilizer formulated for vegetables, diluted according to package instructions, is ideal. Start feeding your plants about a week after they’ve established two sets of true leaves, and continue every 1-2 weeks until fruit formation begins.
- Going Organic: For those who prefer an organic approach, consider using compost tea or composted manure as a natural source of nutrients. These options should be applied less frequently than commercial fertilizers and require some additional preparation.
Pollination Power: The Birds and the Bees (and You!)
Watermelon plants produce separate male and female flowers. For fruit to set, successful pollination is crucial. While nature often takes its course with help from bees or other pollinators, you can give your plants a helping hand, especially if balcony life limits pollinator access.
- The Great Pollination Dance: During the blooming period, carefully observe your watermelon plants. The male flowers (smaller and with a single stamen) appear first, followed by the larger female flowers with a small watermelon at their base. When both types of flowers are open on the same day, use a small paintbrush to gently transfer pollen from the male flower’s stamen to the female flower’s stigma (the central part).
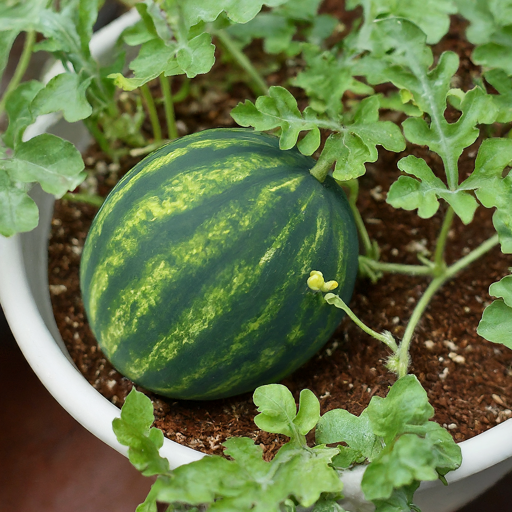
Sweet Success: Recognizing Ripe Watermelon
The moment of truth! How do you know when your homegrown watermelon is ready to be enjoyed? Here are some telltale signs:
- The Touch Test: Give your watermelon a gentle squeeze. A ripe watermelon will have a slight give but feel firm to the touch. A soft or mushy melon is overripe.
- The Thump Test: Knock on the watermelon with your knuckles. A ripe watermelon will produce a hollow sound.
- The Curl Test: The tendril (the curly vine) closest to the stem of the watermelon will turn brown and dry when the fruit is ripe.
Harvesting Your Watermelon Bounty
Congratulations! You’ve nurtured your watermelon plants from tiny seeds to juicy fruits. Here’s how to harvest your reward:
- Sharp and Steady: Use sharp pruning shears or a knife to carefully cut the watermelon vine from the stem, leaving a few inches of vine attached to the fruit.
- Storage Tips: Store your homegrown watermelon at room temperature for up to a week. For longer storage, you can refrigerate it for up to two weeks.
Beyond the Harvest: Troubleshooting and Companion Planting
While growing watermelons in containers is relatively straightforward, there can be occasional hiccups. Here are some troubleshooting tips:
- Yellowing Leaves: This could indicate underwatering, nutrient deficiency, or even sunscald. Address the watering schedule, fertilize if needed, and consider providing shade during the hottest part of the day.
- Powdery Mildew: This fungal disease can appear as white spots on leaves. Improve air circulation by thinning the vines and treat with a fungicide if necessary.
Companion planting can also benefit your watermelon patch. Consider planting herbs like basil or mint near your watermelon container. These fragrant plants can help deter pests and attract beneficial pollinators.
From Seed to Slice: The Satisfaction of Homegrown Watermelon
Growing watermelons in containers is a rewarding adventure. From the joy of witnessing tiny sprouts emerge to the satisfaction of biting into a homegrown slice of juicy sweetness, the process is a testament to the magic of nurturing life. So, grab your seeds, prepare your container, and embark on your own watermelon-growing journey!