In the hustle and bustle of city life, finding a patch of green can feel like finding a needle in a haystack. But what if we told you that you can bring the garden to your urban dwelling using something as ordinary as plastic bottles? That’s right, these 10 urban gardening ideas using plastic bottles are like a breath of fresh air for your concrete jungle. Say goodbye to the same old, same old and say hello to innovation, sustainability, and a touch of Mother Nature right at your window sill!
Table of Contents
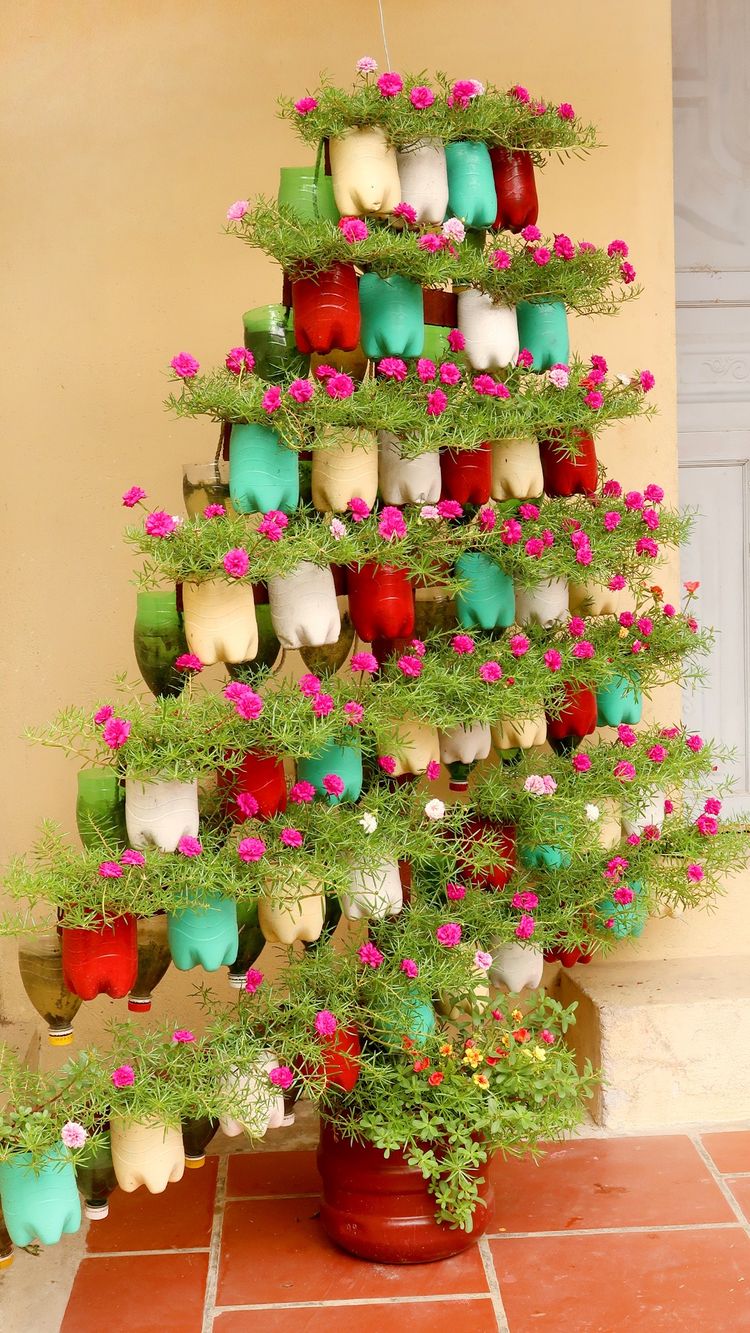
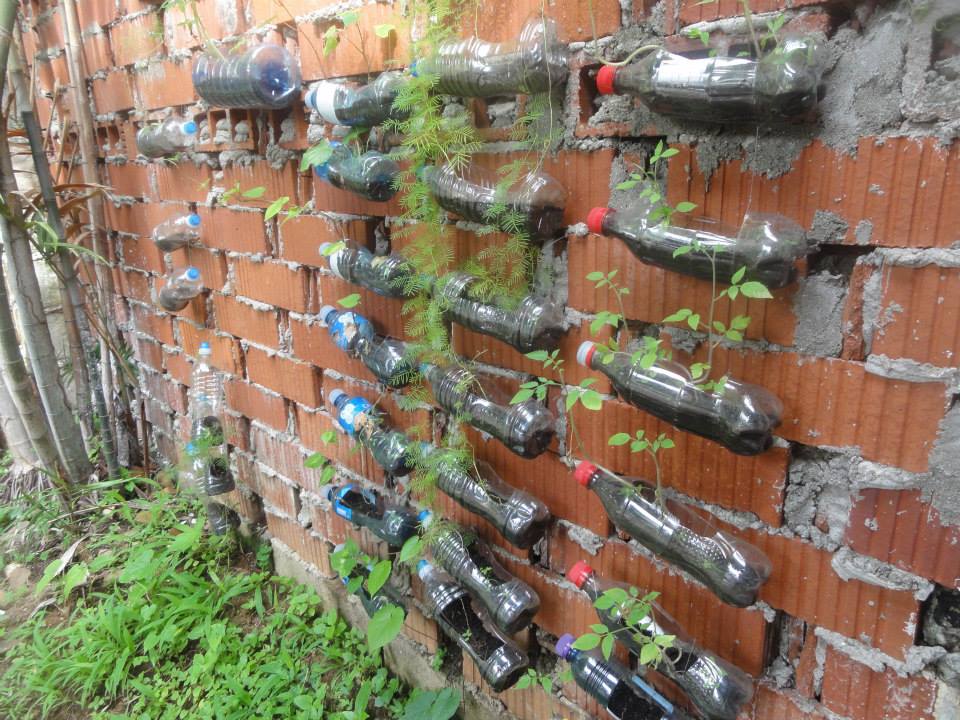
1. Vertical Bottle Garden Wonderland
Running out of room but still dreaming of a garden that soars? Let’s dive into the enchanting world of vertical bottle gardening! This ingenious method lets you maximize your space, turning plastic bottles into a lush, hanging Eden. Imagine vines cascading down, blooms bobbing in the breeze, and a garden that defies gravity. Ready to make your urban oasis soar? Let’s get planting!
How To Make A Vertical Garden Using Plastic Bottles
Collect plastic bottles of various sizes
Scout around for plastic bottles that have reached their end as mere containers. Give them a new lease on life by repurposing them into planting pockets. Be it a soda bottle, a water jug, or even a milk carton – each one is a canvas for your green masterpiece.
Cut them strategically to allow plants to thrive
Before you start snipping, visualize how you want your garden to look. Opt for bottles with flat surfaces – they’ll make attaching to walls or frames easier. Cut openings on one side, making sure they’re large enough to accommodate your chosen plants. Keep the cut edges smooth to avoid harming your precious plants.
String them up securely on a wall or frame.
This step’s like setting the stage for your botanical show. Arrange your cut bottles in rows or clusters, allowing them to overlap for an artistic touch. Use sturdy ropes, wires, or hooks to hang them up, ensuring they’re well-anchored. Keep in mind that some bottles might be heavier when filled with soil and water, so ensure your supports can take the weight.
Fill with soil, plant your favorite greens, and let gravity do its magic! It’s time for the star-studded cast to take their places – your chosen plants! Fill each bottle with nutrient-rich soil, leaving enough space for your plants to spread their roots. Then, carefully tuck in your greens, flowers, or even herbs. As time goes by, gravity will nudge your plants to elegantly drape down, creating a mesmerizing curtain of greenery.
Maintenance Tip: Regularly check your vertical garden for watering needs. Being suspended, they might dry out faster than traditional beds. A good soak when the soil feels dry to the touch will keep your garden thriving.
With your vertical bottle garden in full swing, you’ve transformed your limited space into a dynamic, living masterpiece. It’s like having a hanging art installation that breathes life into your environment.
2. Bottled Herb Haven
Tired of the store-bought herbs that wilt before you get to use them? Time to create your very own Bottled Herb Haven! This notion is not only nifty but as refreshing as a splash of mint in your lemonade. Imagine strolling over to your sunlit windowsill or balcony, snipping off a sprig of basil or thyme, and infusing your dishes with a burst of homegrown flavor. Let’s dive into this garden adventure that’s as cool as a cucumber and as practical as a Swiss army knife.
How To Create Plastic Bottle Herb Planters
Plastic bottles, the more, the merrier!
Scout for plastic bottles like you’re on a treasure hunt! Different sizes and shapes add a touch of whimsy to your herb garden. From soda bottles to juice containers, each bottle holds the potential for a thriving herb haven.
A sunny windowsill or balcony.
Herbs are sun worshippers, and your bottles need a good dose of sunlight to flourish. Find a spot that receives ample sunshine – a windowsill that’s a sun-soaked haven or a balcony that basks in the light. The sun’s rays will be like a nurturing hug for your herbs.
Well-draining soil and herb seeds or seedlings
Herbs are low-maintenance companions, but they’re particular about their soil. Opt for well-draining soil to prevent waterlogging, giving your herbs the cozy, moisture-balanced bed they deserve. Plant herb seeds or get a head start with seedlings, and watch them transform your bottles into a fragrant paradise.
A sprinkle of patience and a dash of love
Growing herbs is a journey of love, and a sprinkle of patience goes a long way. As your seeds germinate and your seedlings flourish, shower them with the attention they need. Water them gently, snip off any dead leaves, and watch them grow with anticipation. Your care will be reciprocated with aromatic rewards.
Maintenance Tip: Keep an eye on your herbs’ growth. Regularly trim them to encourage bushier growth and prevent them from going to seed. And remember, a little conversation with your herbs won’t hurt – they might just respond with extra vigor!
3. Upside-Down Tomato Tango
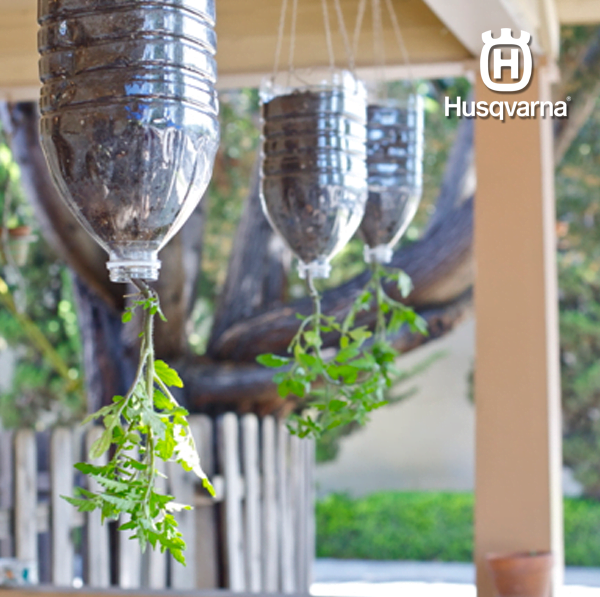
Get ready to flip the script on tomato growing with the Upside-Down Tomato Tango! This gardening twist is like a surprise plot twist in your favorite novel – unexpected, exciting, and totally captivating. Imagine plucking ripe, juicy tomatoes that seem to defy gravity right before your eyes. It’s a gardening adventure as quirky as a three-legged cat but oh-so-rewarding. Let’s dive into this upside-down tomato tango and watch your garden dance with delight!
Creating Your Upside-Down Tomato Plant:
Choose a sturdy plastic bottle
The key to this tango is a solid partner – in this case, a sturdy plastic bottle. Look for a bottle with a solid bottom that can support the weight of your tomato plant and its juicy bounty. A 2-liter soda bottle or a similarly robust container will do the trick.
Cut a hole at the bottom for your tomato plant
Grab your gardening shears and make a bold move – cut a hole at the bottom of the bottle. This is where your tomato plant will make its grand entrance. Ensure the hole is large enough for the plant to comfortably poke through, but not so large that the plant’s root ball falls out.
Fill with soil, secure the plant, and hang it up high
Fill your bottle with nutrient-rich soil, leaving enough space for the plant to settle in comfortably. Now, carefully maneuver your tomato plant through the hole, allowing the roots to dangle into the bottle. Gently pat the soil to secure the plant in place. Then, find a sunny spot and hang the bottle securely – a sturdy hook or hanger will keep your tomato tango in full swing.
Watch your tomatoes defy gravity and ripen before your eyes!
The show’s about to begin! As your tomato plant grows, it’ll reach towards the sun, and its fruits will hang down like precious jewels. Watch as they gradually change from vibrant green to luscious red, defying the norm and captivating all who behold them. It’s a tango of flavors and colors that’ll leave you applauding Mother Nature’s ingenuity.
Maintenance Tip: Regularly water your upside-down tomato plant to keep the soil consistently moist. Since water might escape more quickly from the hanging container, be attentive to its hydration needs.
Cultivating with Upside-Down Tomato Tango in full swing, you’re not just growing tomatoes – you’re cultivating a spectacle that’s as delightful as it is delicious.
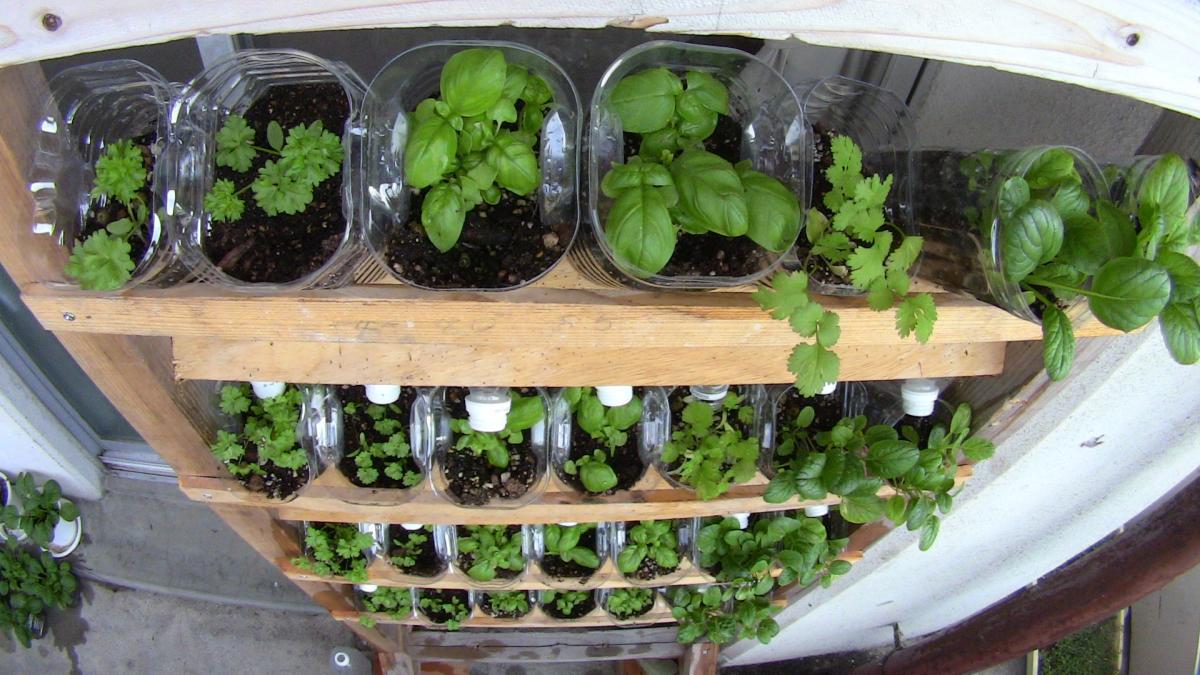
4. Plastic Bottle Greenhouse Nook
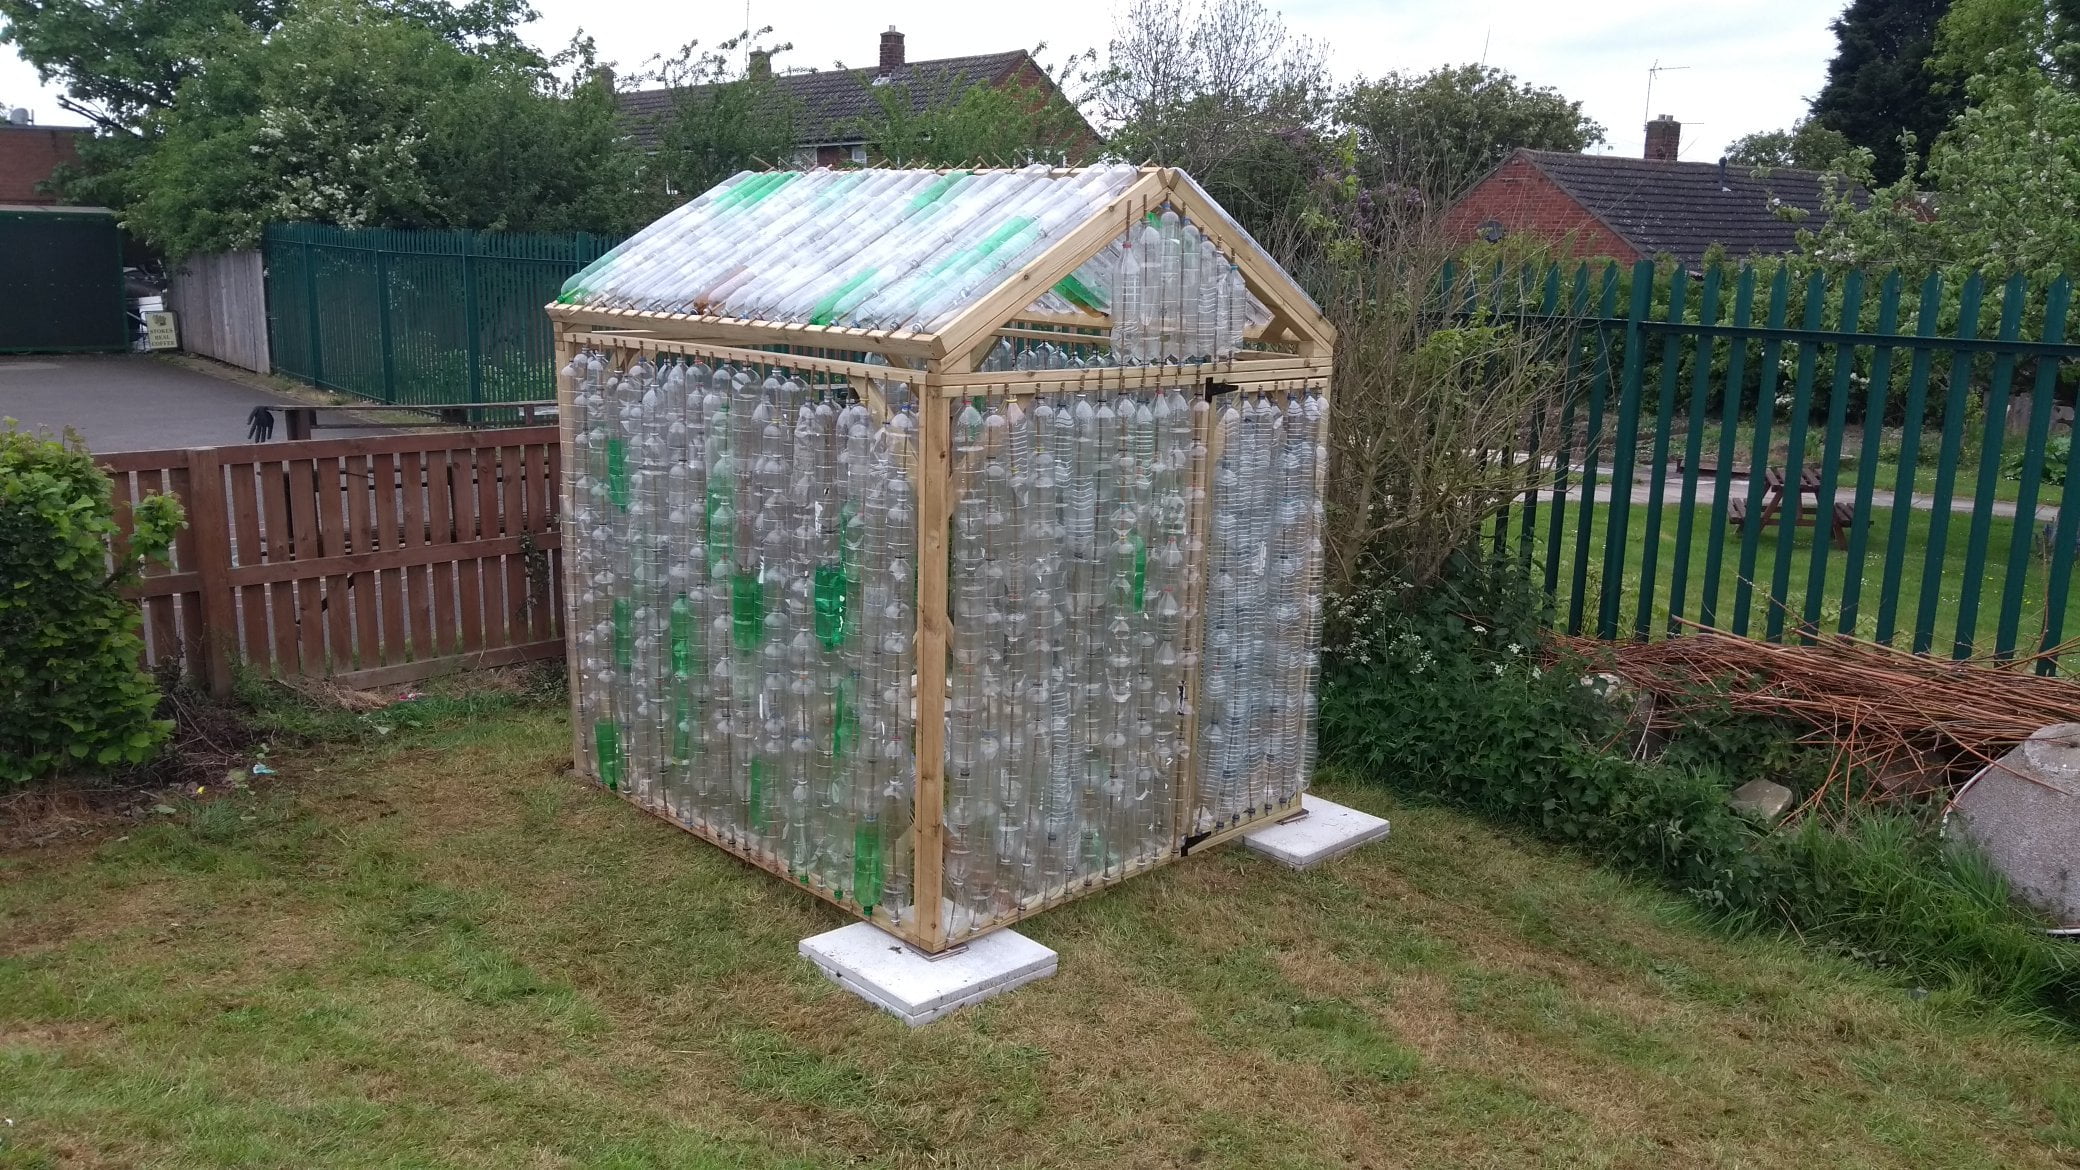
Got a hankering for a greenhouse but don’t have acres to spare? Say hello to your very own Plastic Bottle Greenhouse Nook! This ingenious idea is like a cozy reading corner for your plants – snug, sustainable, and oh-so-adorable. Imagine a charming nook where your seeds can snuggle up, sip in the sunshine, and grow at their own pace. It’s a dream come true that’s as sweet as honey and as cozy as a warm blanket. Let’s dive into the crafting magic of your plastic bottle greenhouse nook!
Crafting Your Plastic Bottle Greenhouse Nook
Gather plastic bottles of the same size
Time to round up those plastic bottles like they’re your gardening troops! Aim for bottles of the same size to ensure uniformity in your mini greenhouse. From water bottles to juice jugs, each one is a building block in your botanical haven.
Build a frame or find a cozy corner
The stage is set! You can either create a frame using wood or repurpose an existing structure like a trellis or a wall. Alternatively, find a snug corner in your outdoor space that’s protected from harsh winds. This will be the backdrop for your plastic bottle greenhouse nook.
Arrange and secure the bottles to form your mini greenhouse
Time for some bottle arranging brilliance! Place the bottles side by side, forming rows that resemble the walls of your greenhouse. Secure them together using zip ties or strong twine, ensuring they’re snugly fastened. The bottles will create a protective barrier, shielding your plants from external elements.
Pop in your choice of seeds, give ’em a sprinkle, and let them bask in their personal haven
Now for the main act – your plants! Fill the base of your plastic bottle greenhouse with nutrient-rich soil. Gently plant your chosen seeds, imagining the lush paradise they’ll become. Sprinkle them with water and give them a pep talk if you’re feeling particularly friendly. Then, step back and let your seeds soak in the comfort of their cozy, bottle-built haven.
Maintenance Tip: Keep an eye on the temperature inside your plastic bottle greenhouse. On sunny days, it might get warmer than you think. Consider propping open the tops of a few bottles to allow air circulation if needed.
So, gather your bottles, pick that snug corner, and craft a greenhouse nook that’s as heartwarming as your favorite childhood story!
5. Hydroponic Elegance in Bottles
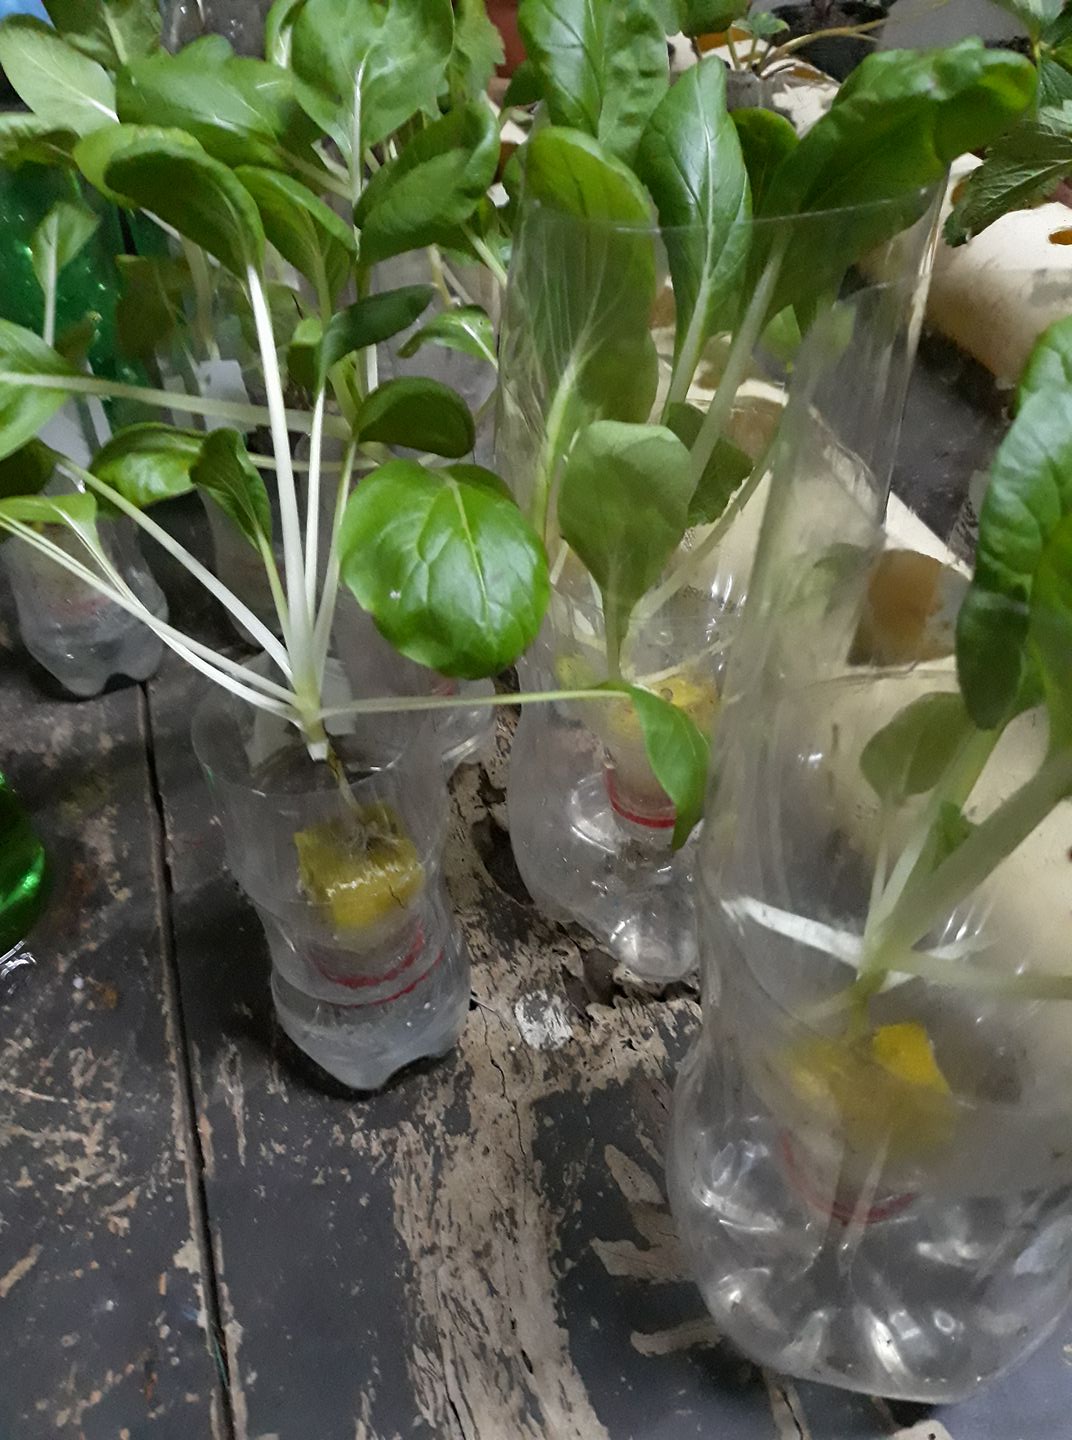
Ready to take urban gardening to the next level? Introducing Hydroponic Elegance in Bottles – a sophisticated, soil-free gardening endeavor that’s as sleek as a black cat gliding through the night. Picture this: plants suspended in clear bottles, their roots delicately dipping into nutrient-rich water. It’s the epitome of urban gardening sophistication, where traditional soil takes a back seat and hydroponic innovation takes center stage. Let’s dive into the art of assembling your hydroponic bottle garden!
Assembling Your Hydroponic Bottle Garden:
Select a few transparent plastic bottles
Think of these bottles as chic vases for your plant masterpieces. Opt for clear plastic bottles that allow you to admire the delicate dance of roots as they explore their aquatic haven. Different sizes add an artistic touch to your hydroponic setup.
Create a water reservoir at the bottom
Flip your bottles upside down and let’s start crafting! At the bottom of each bottle, cut a small opening – just enough for water to flow in. This will serve as the entrance to the aquatic haven that’ll nourish your plants.
Add a hydroponic nutrient solution
Time to concoct a special elixir for your plants! Prepare a hydroponic nutrient solution by following the instructions on the package. Pour this liquid gold into the bottle, filling it enough to submerge the roots of your plants once they’re suspended.
Suspend your plants with their roots dipping into the solution
Get ready to play plant whisperer! Gently insert your plant’s roots into the bottle through the opening at the bottom. You might need to do a little wiggling and nudging, but once they’re comfortably inside, they’ll start their hydroponic journey.
Sit back and admire the elegance of soil-free growth
Like an art installation, your hydroponic bottle garden is ready to grace your space. Hang the bottles in a sunny spot where they can soak in the light and grow without the constraints of soil. Watch as your plants thrive and flourish, their roots suspended in nourishing water, giving you a front-row seat to the elegance of soil-free growth.
Maintenance Tip: Keep an eye on the water level in your bottles. As your plants drink up the hydroponic solution, ensure it stays at an appropriate level to support their growth.
Creating a hydroponic plastic bottle garden is a visual spectacle where plants thrive without the need for traditional soil, and innovation meets aesthetics. So, select those bottles, mix up that hydroponic solution, and create a garden that’s as sophisticated as it is sustainable – a true urban masterpiece!
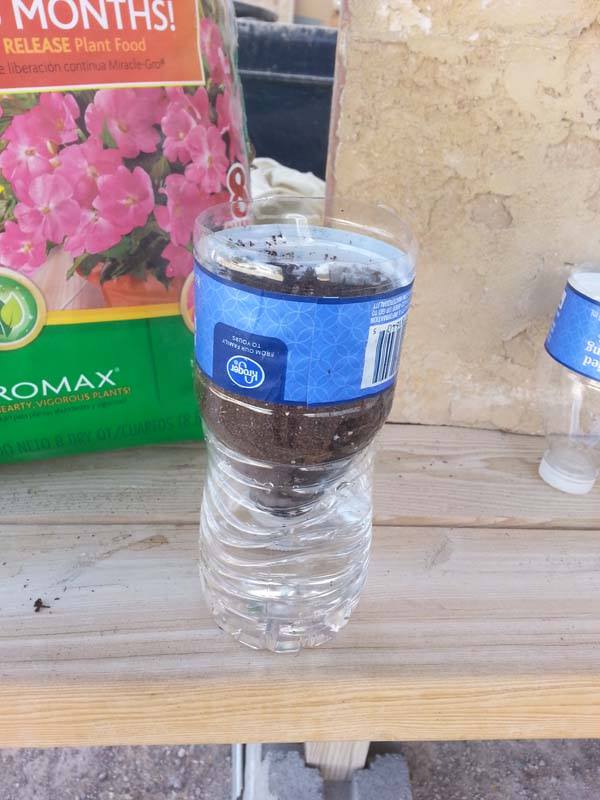
6. Plastic Bottle Self-Watering Wonders
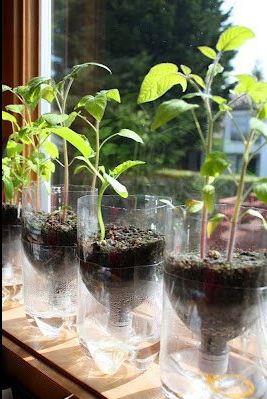
Tired of the waterworks for your plants? Enter the world of Plastic Bottle Self-Watering Wonders – the solution that puts an end to forgotten watering schedules. These wonders keep your greens hydrated without you breaking a sweat, making plant care as easy as a slice of pie! Imagine a garden that quenches its own thirst, leaving you with more time to savor the beauty of your lush oasis. Let’s dive into the craft of self-watering planters that are pure genius.
Crafting Your Self-Watering Bottle Planters:
Snag a couple of plastic bottles with screw caps
First things first – gather your heroes! Find a pair of plastic bottles with screw caps, like those from bottled water or soda. These caps will play a vital role in the self-watering magic that’s about to unfold.
Pierce a hole in the cap and thread a wick through
Time to get a little technical. Grab a sharp object – a nail, a needle, or even a thumbtack will do – and pierce a hole through the center of one of the caps. Now, thread a wick through this hole – it could be a piece of cotton, a shoelace, or even a strip of an old t-shirt. The wick is the bridge between water and soil, ensuring your plants drink up as needed.
Fill one bottle with water, invert it into the other
Here’s where the magic begins! Fill one of the bottles with water – this is your plant’s hydration station. Invert this bottle and place it into the other, ensuring the wick dangles into the water-filled bottle. The wick acts like a lifeline, delivering water to the soil as it dries up, just like a superhero coming to the rescue.
Plant your flora in the water-filled bottle and let the wick work its magic!
It’s time to introduce your plants to their new self-sustaining home. Fill the bottle without the inverted water container with nutrient-rich soil. Plant your chosen flora – be it vibrant flowers or leafy greens. Now, sit back and let the wick do its thing. As the soil dries, the wick draws water from the inverted bottle, quenching your plant’s thirst. It’s like having a personal butler for your plants!
Maintenance Recommendation: Regularly inspect the water level within the inverted bottle and replenish when necessary.The wick can only do so much if its water source runs dry.
With your Plastic Bottle Self-Watering Wonders in place, you’ve become the guardian angel of your plants. It’s a system that works tirelessly to keep your greens happy and hydrated, making you the envy of gardeners everywhere. So, grab those bottles, thread those wicks, and watch as your plants flourish under your ingenious care – it’s plant parenting at its finest!
7. Bottle Vases for Upcycled Flower Delights
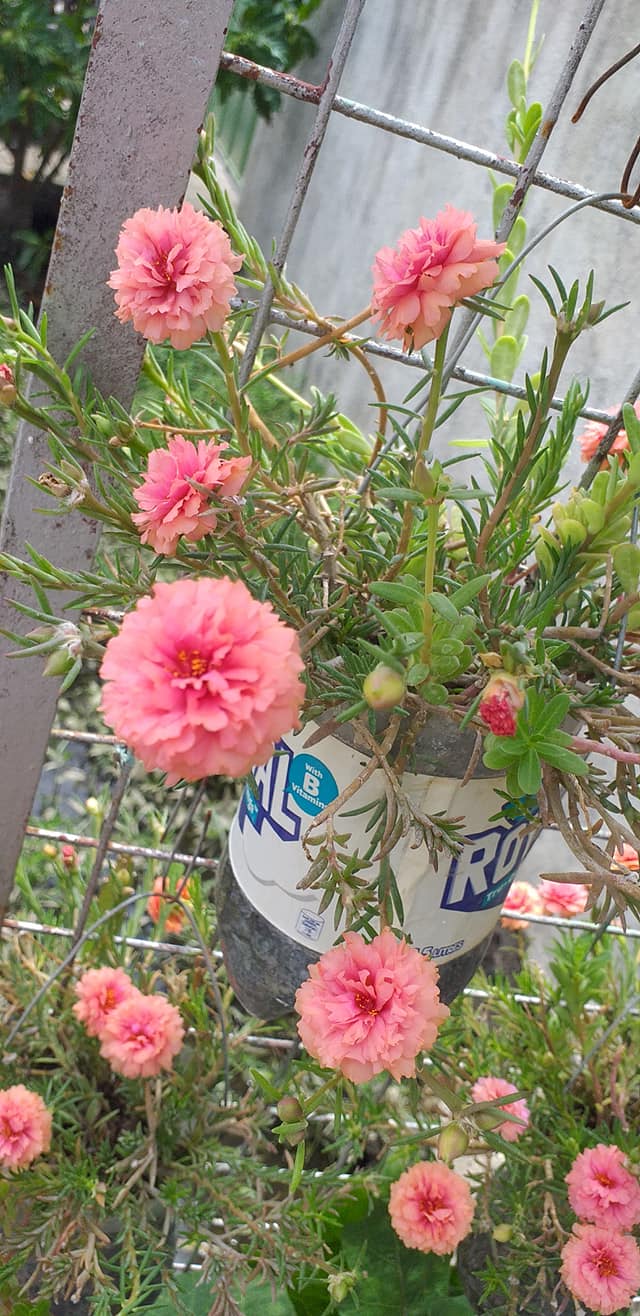
Why let the fun stop at the garden edge? Let’s take the charm of your bottle border to the next level with Bottle Vases for Upcycled Flower Delights. These vases are like a second act to your gardening masterpiece – a touch of elegance that brings nature’s beauty right to your outdoor dining space. Imagine savoring a meal amidst the fragrance of fresh-cut flowers, all while embracing the eco-friendly spirit of upcycling. It’s the perfect blend of sophistication and sustainability.
How to Create Bottle Vases for Upcycled Flower Delights
Snag a couple of plastic bottles with screw caps
First things first – gather your heroes! Find a pair of plastic bottles with screw caps, like those from bottled water or soda. These caps will play a vital role in the self-watering magic that’s about to unfold.
Pierce a hole in the cap and thread a wick through
Time to get a little technical. Grab a sharp object – a nail, a needle, or even a thumbtack will do – and pierce a hole through the center of one of the caps. Now, thread a wick through this hole – it could be a piece of cotton, a shoelace, or even a strip of an old t-shirt. The wick is the bridge between water and soil, ensuring your plants drink up as needed.
Fill one bottle with water, invert it into the other
Here’s where the magic begins! Fill one of the bottles with water – this is your plant’s hydration station. Invert this bottle and place it into the other, ensuring the wick dangles into the water-filled bottle. The wick acts like a lifeline, delivering water to the soil as it dries up, just like a superhero coming to the rescue.
Plant your flora in the water-filled bottle and let the wick work its magic!
It’s time to introduce your plants to their new self-sustaining home. Fill the bottle without the inverted water container with nutrient-rich soil. Plant your chosen flora – be it vibrant flowers or leafy greens. Now, sit back and let the wick do its thing. As the soil dries, the wick draws water from the inverted bottle, quenching your plant’s thirst. It’s like having a personal butler for your plants!
Maintenance Tip: Periodically check the water level in the inverted bottle and refill as needed. The wick can only do so much if its water source runs dry.
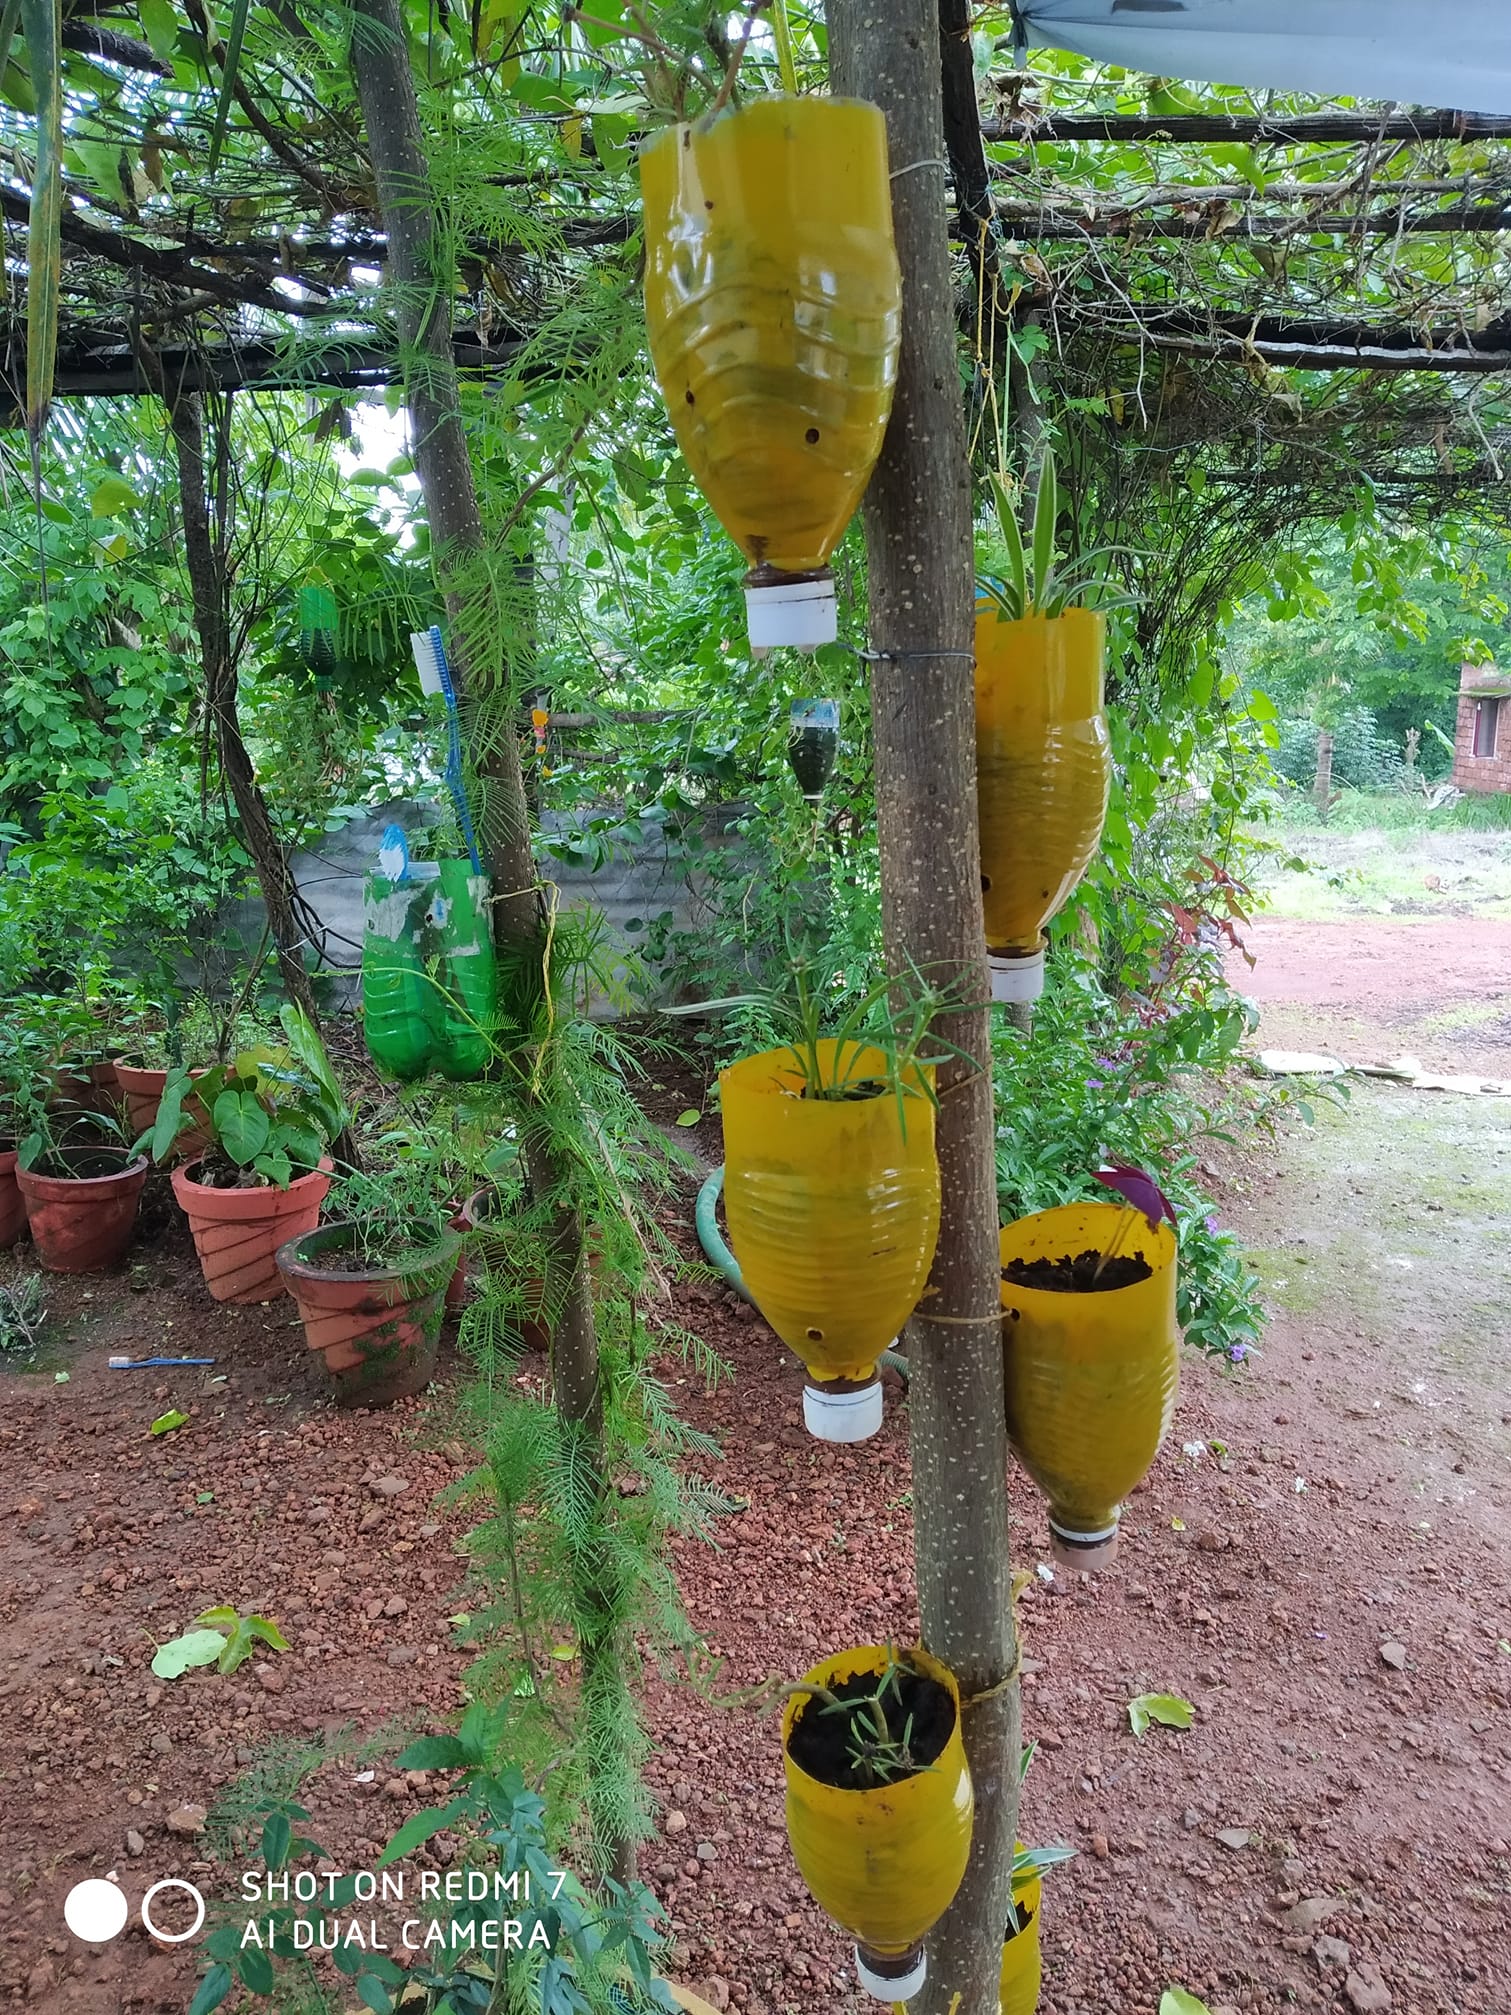
8. Bottle Hanging Gardens

Looking to take your gardening to new heights? Say hello to Bottle Hanging Gardens – a crafty and captivating way to elevate your greenery game. This idea is like adding a touch of magic to your outdoor space, where plants cascade in mid-air, defying gravity and turning your garden into a vertical masterpiece. Imagine a symphony of colors and textures hanging at eye level, inviting awe and wonder into your garden oasis. Let’s dive into the art of crafting these stunning hanging gardens that are as enchanting as they are innovative.
How to Create Bottle Hanging Gardens
Gather your materials
First things first – gather your supplies. You’ll need plastic bottles of various sizes, potting mix, colorful flowers, cascading vines, a pair of scissors, and sturdy strings or twine.
Cut the bottles in half
Get your creative hands ready! Take your plastic bottles and carefully cut them in half horizontally. The top portion will become your planting container, while the bottom can be repurposed for other eco-friendly projects.
Punch holes in the sides
Now it’s time for a bit of DIY flair. On opposite sides of the bottle’s rim, punch holes using a hole puncher or heated nail. These holes will serve as entry points for your strings or twine, so make sure they’re large enough to accommodate the material.
Prepare your plants
Select a mix of vibrant flowers and cascading vines that will thrive in hanging conditions. Petunias, trailing lobelia, and ivy are great options. Prepare your plants by gently removing them from their original pots, loosening the roots, and ensuring they’re ready to flourish in their new hanging homes.
Thread the strings through the holes
This step’s like adding the finishing touch to your masterpiece. Thread the strings or twine through the holes you’ve punched, creating a loop that can hold the bottle securely. Make sure the strings are of equal length to ensure even hanging.
Fill the bottles with potting mix and plants
With the strings in place, it’s time to fill the top portion of each bottle with potting mix. Carefully plant your selected flowers and cascading vines, arranging them in a way that complements each other’s growth habits.
Hang your Bottle Hanging Gardens
Find a sunny spot where you’d like to showcase your hanging gardens. Use hooks or brackets to suspend the bottles from a sturdy support – it could be a pergola, a tree branch, or even a custom-built frame.
Step back and admire your vertical masterpiece
As you step back and take in the sight of your Bottle Hanging Gardens, you’ll be filled with a sense of accomplishment and wonder. These suspended gardens are more than just plants – they’re a living art installation that adds dimension, charm, and a touch of whimsy to your outdoor space.
9. Bottle Herb Tower
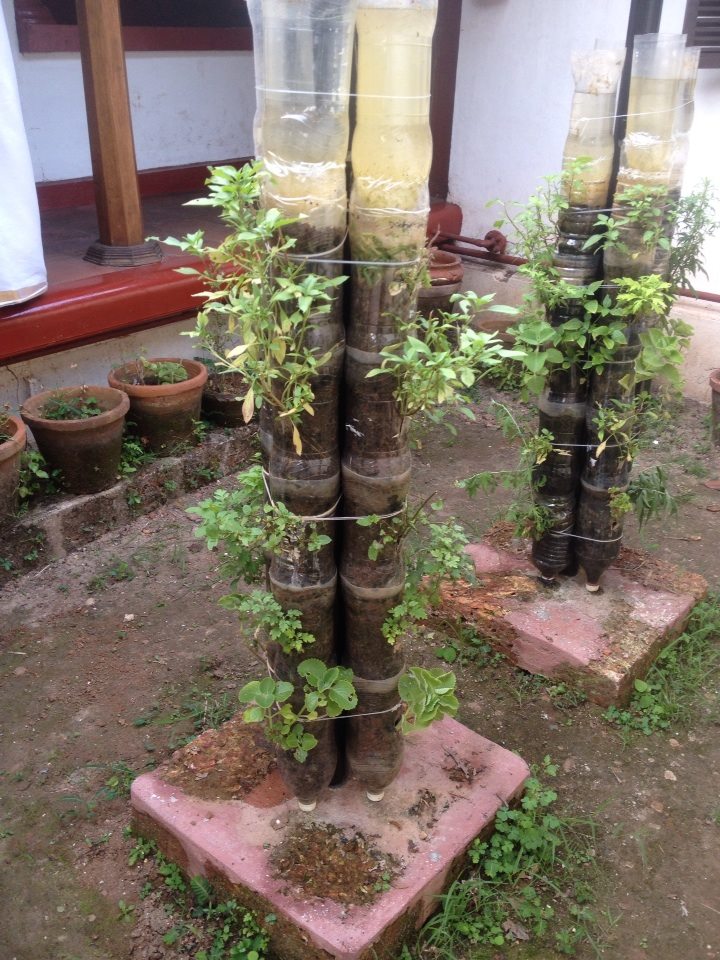
In the realm of limited space but boundless herb-loving zeal, emerges the Bottle Herb Tower – a botanical symphony that marries practicality with allure. Visualize an arrangement akin to a tower of flavor, a vertical haven where herbs like basil, mint, and parsley ascend with pride. Here, space scarcity meets ingenuity, and your fingertips become gateways to a realm of herbal delight. A world where culinary artistry finds its muse in the burst of freshness that your very own herb haven brings. Let us venture into the enchanting artistry of the Bottle Herb Tower, where vertical space transforms into a verdant sanctuary of taste.
How to Create a Bottle Herb Tower
Gather your materials
Collect the materials you’ll need for this inventive project. You’ll require plastic bottles, a pair of scissors or a utility knife, potting mix, herb seedlings or seeds, and a sunny spot to display your tower.
Prepare the plastic bottles
Time to get your hands busy! Take the plastic bottles and remove their labels. Wash and dry them thoroughly. Next, using scissors or a utility knife, carefully cut out sections of the bottles. These sections will become planting pockets for your herbs.
Fill the pockets with potting mix
Grab your potting mix and fill each cut-out section with soil. Make sure the soil is well-draining and nutrient-rich, creating a cozy home for your herb seedlings or seeds.
Plant your herbs
It’s planting time! Gently plant your chosen herb seedlings or seeds into the prepared pockets. Consider arranging different herbs in various levels to ensure optimal growth and aesthetic appeal.
Stack the bottles
Here’s where the tower comes to life! Begin stacking the prepared bottles on top of each other. The bottle openings should face upwards, creating a tiered effect. As you stack, make sure the bottles are stable and secure. The lower bottles will act as planters for the upper ones.
Water and care: Give your newly planted herbs a good drink of water. As you water, make sure the excess water drains properly. Over time, the water will trickle down from the upper bottles to the lower ones, creating a self-watering effect. Regularly check the soil moisture and water accordingly.
Place in a sunny spot
Find a sunny location to place your Bottle Herb Tower. Herbs love sunlight, so ensure they receive ample sunshine throughout the day. A balcony, patio, or a sunny windowsill are all excellent options.
Harvest and enjoy
As your herbs grow, you’ll soon have a tower of flavors right at your fingertips. When your herbs reach a good size, start harvesting by snipping off the leaves as needed. Their fresh fragrance and vibrant taste will elevate your culinary endeavors.
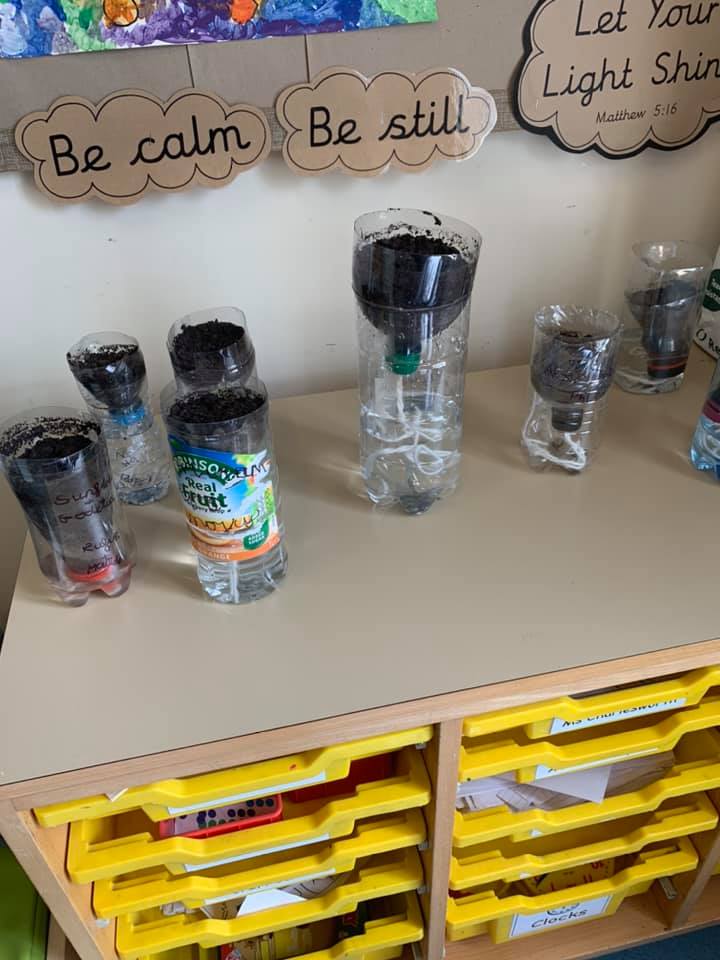
10. Bottle Seed Starters
Prepare for a grand unveiling of your plant’s entry into the world – introducing Bottle Seed Starters! This ingenious method bestows your seeds with a snug and meticulously controlled space for sprouting. Think of it as a nurturing cocoon of growth, where seeds embark on their journey with the utmost care. Picture delicate sprouts emerging within the secure embrace of a transparent plastic bottle, shielded from the elements. Let’s delve into the artistry of Bottle Seed Starters and offer your seeds a regal commencement they truly deserve.
How to Create Bottle Seed Starters
Gather your materials
Embrace the tools of creation for this horticultural venture. Assemble clear plastic bottles, a pair of scissors or a utility knife, potting mix, a selection of seeds, and a warm corner with gentle, filtered sunlight.
Prepare the plastic bottles
Begin the transformation by stripping away any labels and ensuring the cleanliness of your plastic bottles. Select the upper segment of the bottle – this portion shall metamorphose into a safeguarding dome for your budding seedlings. Utilize scissors or a utility knife to delicately sever the bottle at your chosen height.
Fill with potting mix
Bestow a welcoming environment upon your seeds by filling the severed bottle section with potting mix, leaving a modest space from the rim. Gently press down the soil, granting a firm yet breathable foundation for the coming growth.
Plant your seeds
Bestow each chosen seed with a coveted spot within the potting mix. Adhere to the recommended planting depth specific to each seed variety. Whether nurturing floral wonders, aromatic herbs, or delectable vegetables, ensure the seeds rest comfortably within their newfound earthy cradle.
Reassemble and secure
Envelop the upper bottle segment back onto the base, creating a snug alignment. If a cap adorns your bottle, gracefully reinstate it. This reunion orchestrates a miniature greenhouse ambiance, capturing warmth and moisture to orchestrate the ideal conditions for germination.
Position in a warm, diffused sunlight niche
Select a tranquil realm for your Bottle Seed Starter to reside. Indirect sunlight reigns supreme – a balanced harmony avoiding excessive heat or parching dryness. Think a windowsill kissed by dappled light or a sheltered alcove on your veranda.
Observe and hydrate as needed
Embark on a vigilant guardianship of your diminutive greenhouse. Should you glimpse condensation forming on the bottle’s interior, it signals a suitable humidity level. In the event of aridity, a gentle misting shall suffice. Approach watering with discretion, for the sealed realm retains moisture dutifully.
Transplant with grace
As your seedlings flourish, gracing you with their initial true leaves, anticipate their readiness for new horizons – be it a grander pot or direct integration into your garden’s embrace. Engage in a gradual acclimatization to outdoor surroundings prior to transplantation, ensuring a seamless transition.
Conclusion
Urban gardening isn’t limited to sprawling landscapes and fancy tools. With these 10 urban gardening ideas using plastic bottles, you’ve got the power to transform your urban space into a thriving green haven. Get your creative juices flowing, gather those bottles, and let your imagination run wild. It’s time to embrace the beauty of sustainability and watch your plastic bottle garden bloom like a field of wildflowers. So, why wait? Let’s dive into the world of innovative gardening and turn those plastic bottles into eco-friendly masterpieces!